How can we help you?

Popular searches
ExportWorkflowCatalog
HomeKnowledge base

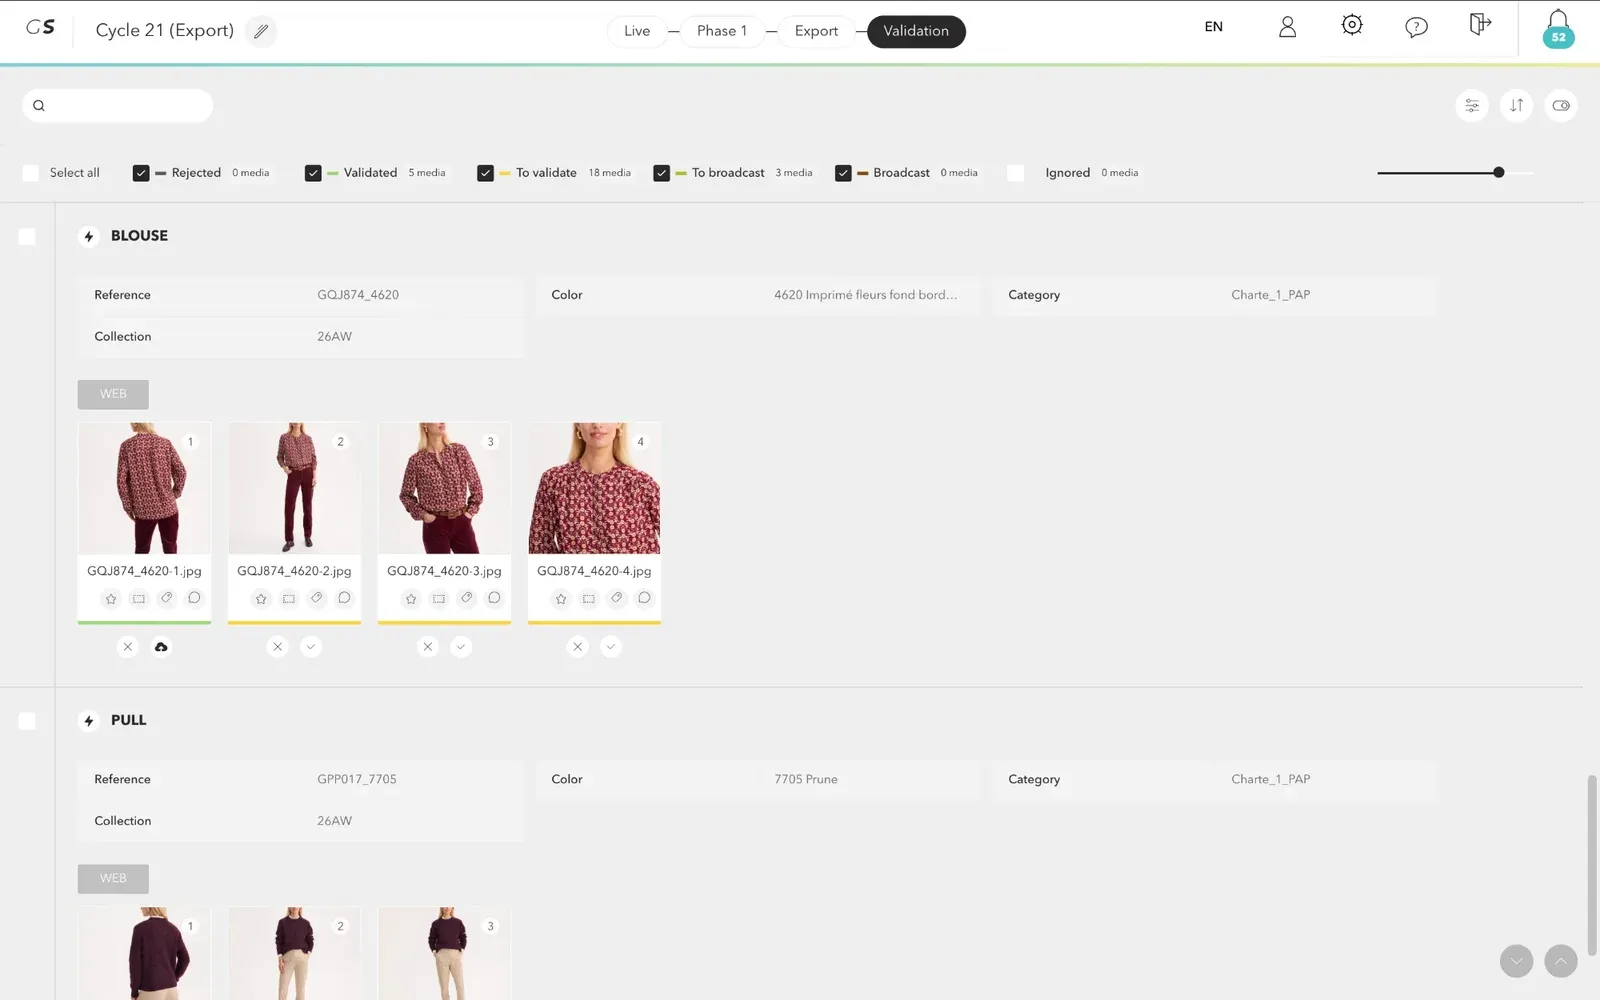
The new validation brings together on a single screen the review, validation, rejection, renaming, download and broadcast of your media, with filters and bulk actions.

Accessing the new validation

The new validation is gradually replacing the current validation screen. It opens from the same links: the home page, or the Validation step of a production.

Switching between versions

An account administrator must first enable the option in App settings > Advanced features. Users can then use the keyboard shortcut Shift + V on the validation page to switch from the old validation to the new one, and back. Their choice is kept for their next visits. The administrator can also make the new validation mandatory for all users of the account.

Restricted users

Restricted users always access the new validation. They only see the media within their scope (catalog and shooting methods).
The screen at a glance

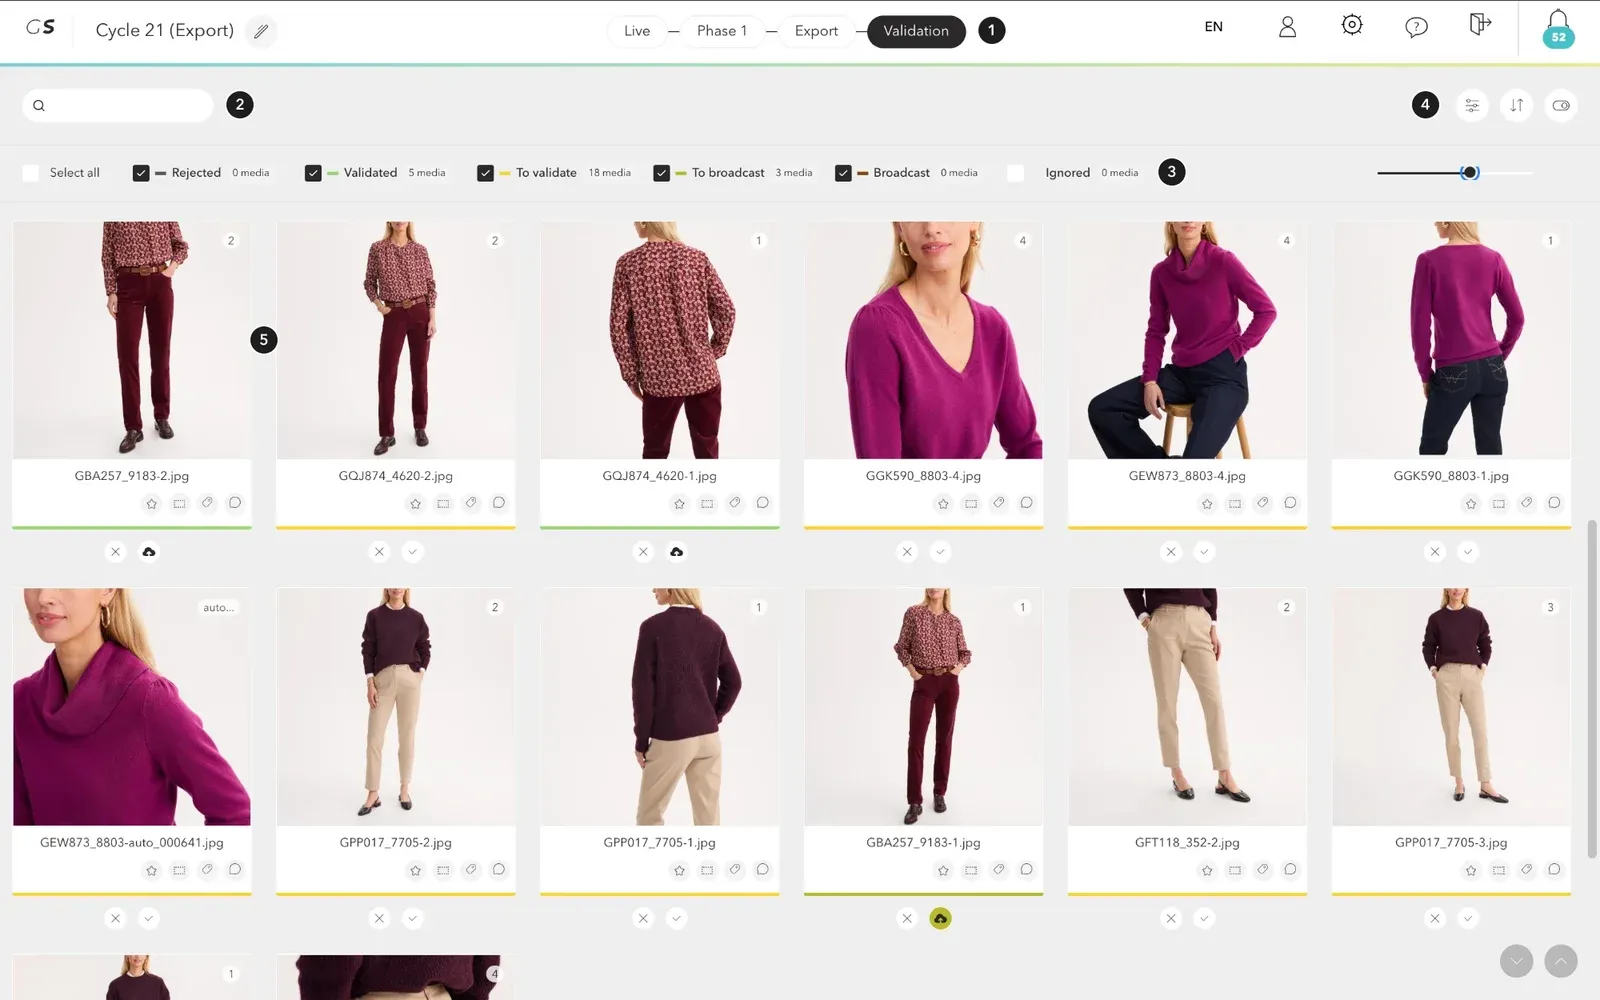
New validation screen with numbered markers: production steps, search, status filters, Filters / Sort by / Display buttons and media grid
  1. Production stepsAt the top of the screen, move from one production step to another: Live, Phase 1, Export, Validation.
  2. SearchSearch the media of the production.
  3. Status filtersCheck or uncheck a status to show or hide the corresponding media. The number of media in each status is shown next to it.
  4. Filters, sorting and displayThe three buttons at the top right open the Filters panel, the Sort by menu and the Display panel.
  5. Media gridEach thumbnail shows the media, its file name, its view number and its Reject and Validate buttons. The slider above the grid sets the number of images per row.

Statuses

StatusMeaning
To validateThe media is waiting for your decision.
RejectedThe media has been rejected and goes back to retouching.
ValidatedThe media has been validated.
To broadcastThe validated media is waiting to be broadcast.
Broadcast errorThe broadcast of the media failed.
BroadcastThe media has been broadcast.
IgnoredThe media is excluded from validation.

Validating or rejecting a media

Under each thumbnail, click the check mark to Validate the media, or the cross to Reject it. You can also select several media or several references to validate or reject them in bulk (see Bulk options).

Click a thumbnail to open the media full size in the zoom. There you can add annotations and comments for the retouchers, and compare the versions of the media.

Rejection reasons

By default, when you reject a media, we recommend adding an annotation or a comment from the zoom.

The production manager can also make the rejection reason mandatory. In this case, clicking Reject opens a menu to choose the reason. The reason is saved with the rejection and appears in the reporting.
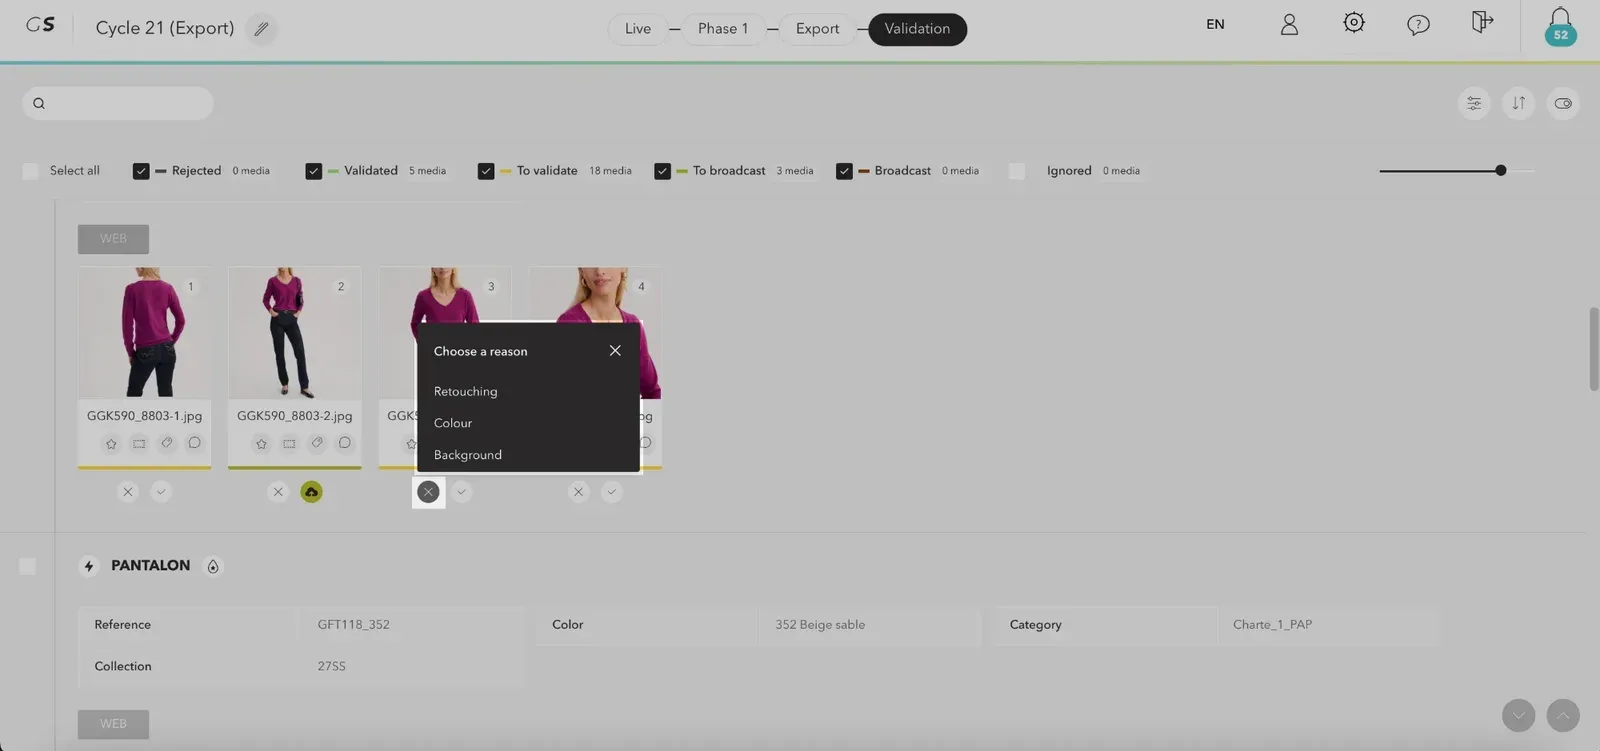
Rejecting a media: when you click Reject, the "Choose a reason" window offers the production's rejection reasons

To enable rejection reasons, go to the production settings > Warnings and workflow > Validation > Refusal management:

  1. Check Pre-record refusal reasons.
  2. Enter the main reasons (quick access, 5 max) and the secondary reasons (drop-down list).
  3. Click Save.

Bulk options

Check the media to process, or click Select all (shortcut Ctrl + A, or Cmd + A on Mac). A bar appears at the bottom of the screen: it shows the number of selected media, offers Deselect all and groups the actions on the selection on the right.

Changing the status

Move all the selected media to the Rejected, Validated, To broadcast or Ignored status at once. For a bulk rejection, a window lets you add a comment.
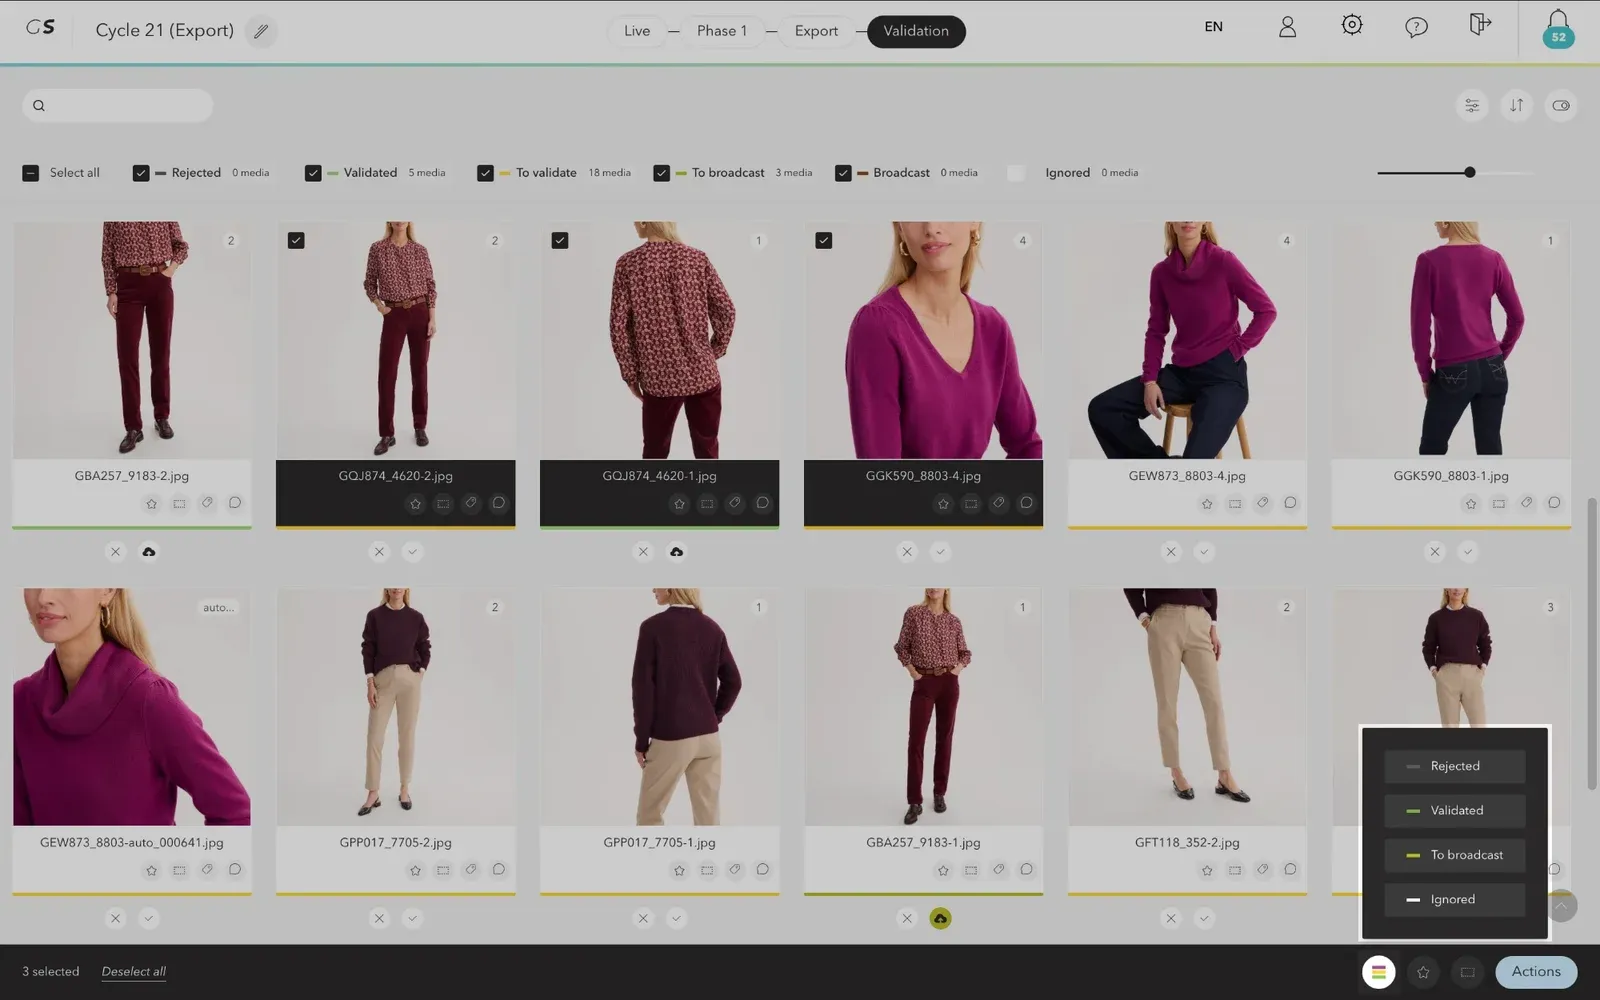
Bulk options: three media selected and the status list opened from the bottom bar

Rating the selection

Give a star rating to the selected media.

Adding a color label

Give a color label (blue, green, orange, pink, purple, red, yellow, white) to the selected media.

The Actions menu

The Actions menu groups the other actions:
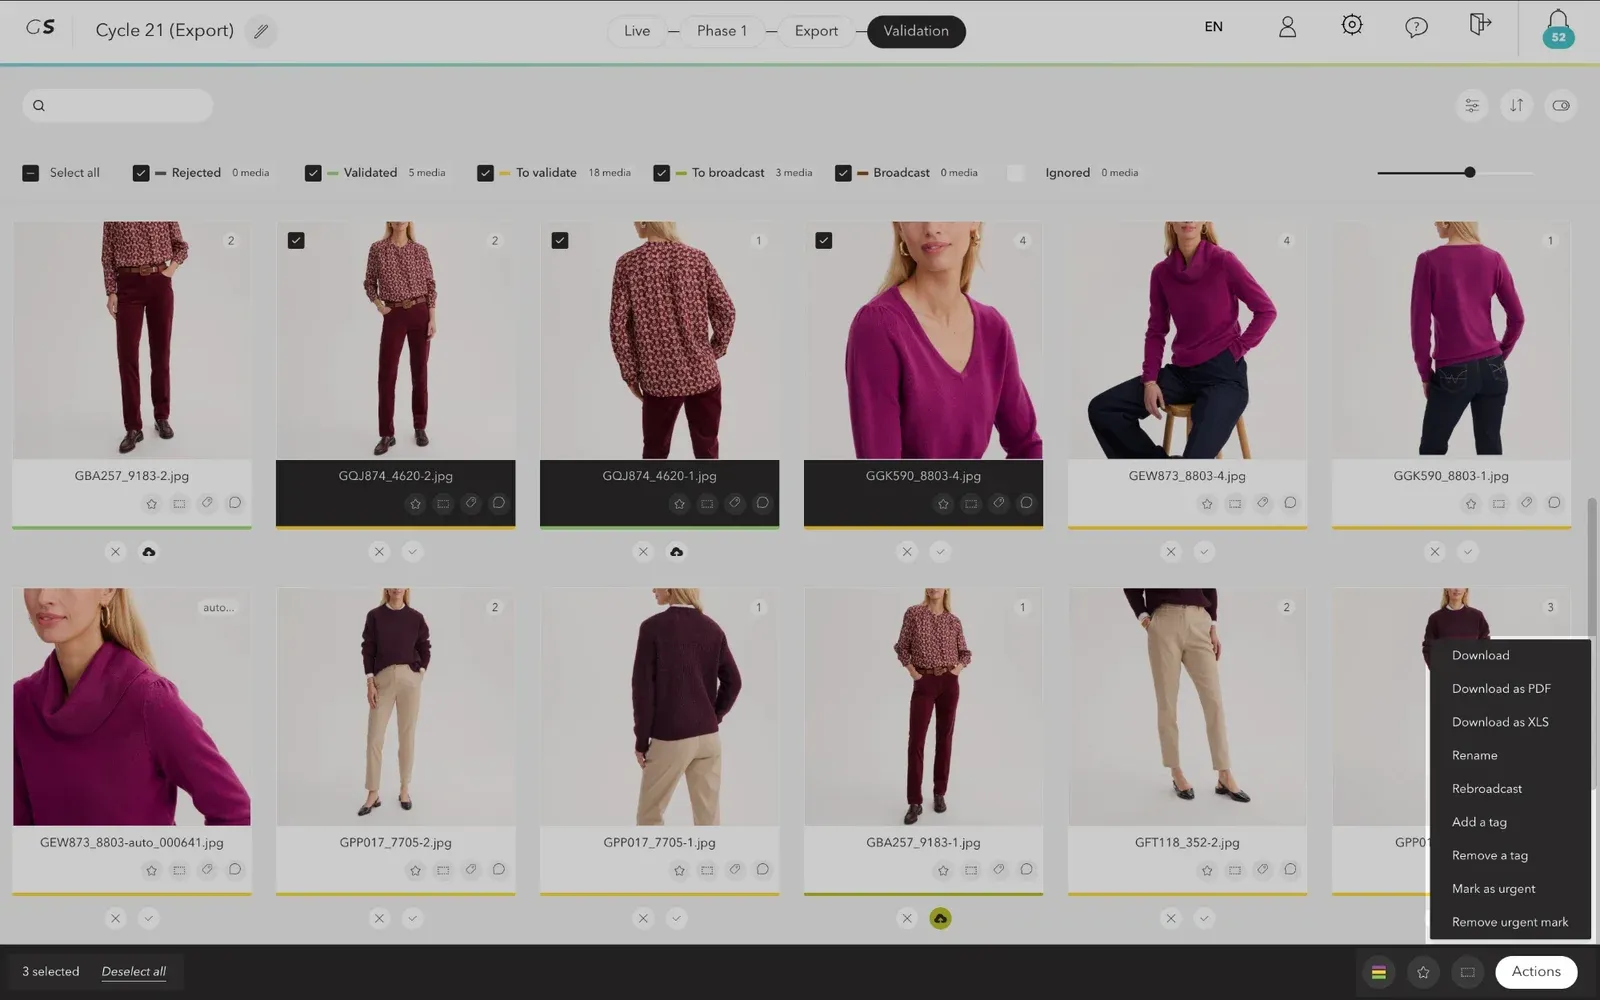
  • Rename the files;
  • Download the files, Download as PDF or Download as XLS;
  • Rebroadcast files that have already been broadcast;
  • Add a tag or Remove a tag;
  • Mark as urgent or Remove urgent mark.
Bulk options: the Actions menu open (Download, Download as PDF or XLS, Rename, Rebroadcast, tags, urgent mark)
  • By default, only validated or broadcast media can be downloaded. If your selection contains other media, Grand Shooting offers to download only the allowed ones. If needed, the production manager can allow media download in the production settings.
  • The PDF download offers several options: orientation, format, number of photos per page, cover page, page break per reference and comments and annotations added as an appendix.

Renaming and rebroadcasting

Select the media, then click Actions > Rename. The renaming table lets you change the reference and the view of each file: its name updates automatically. While you type a reference, Grand Shooting suggests references from the catalog. Click Save to confirm your changes, or Cancel.
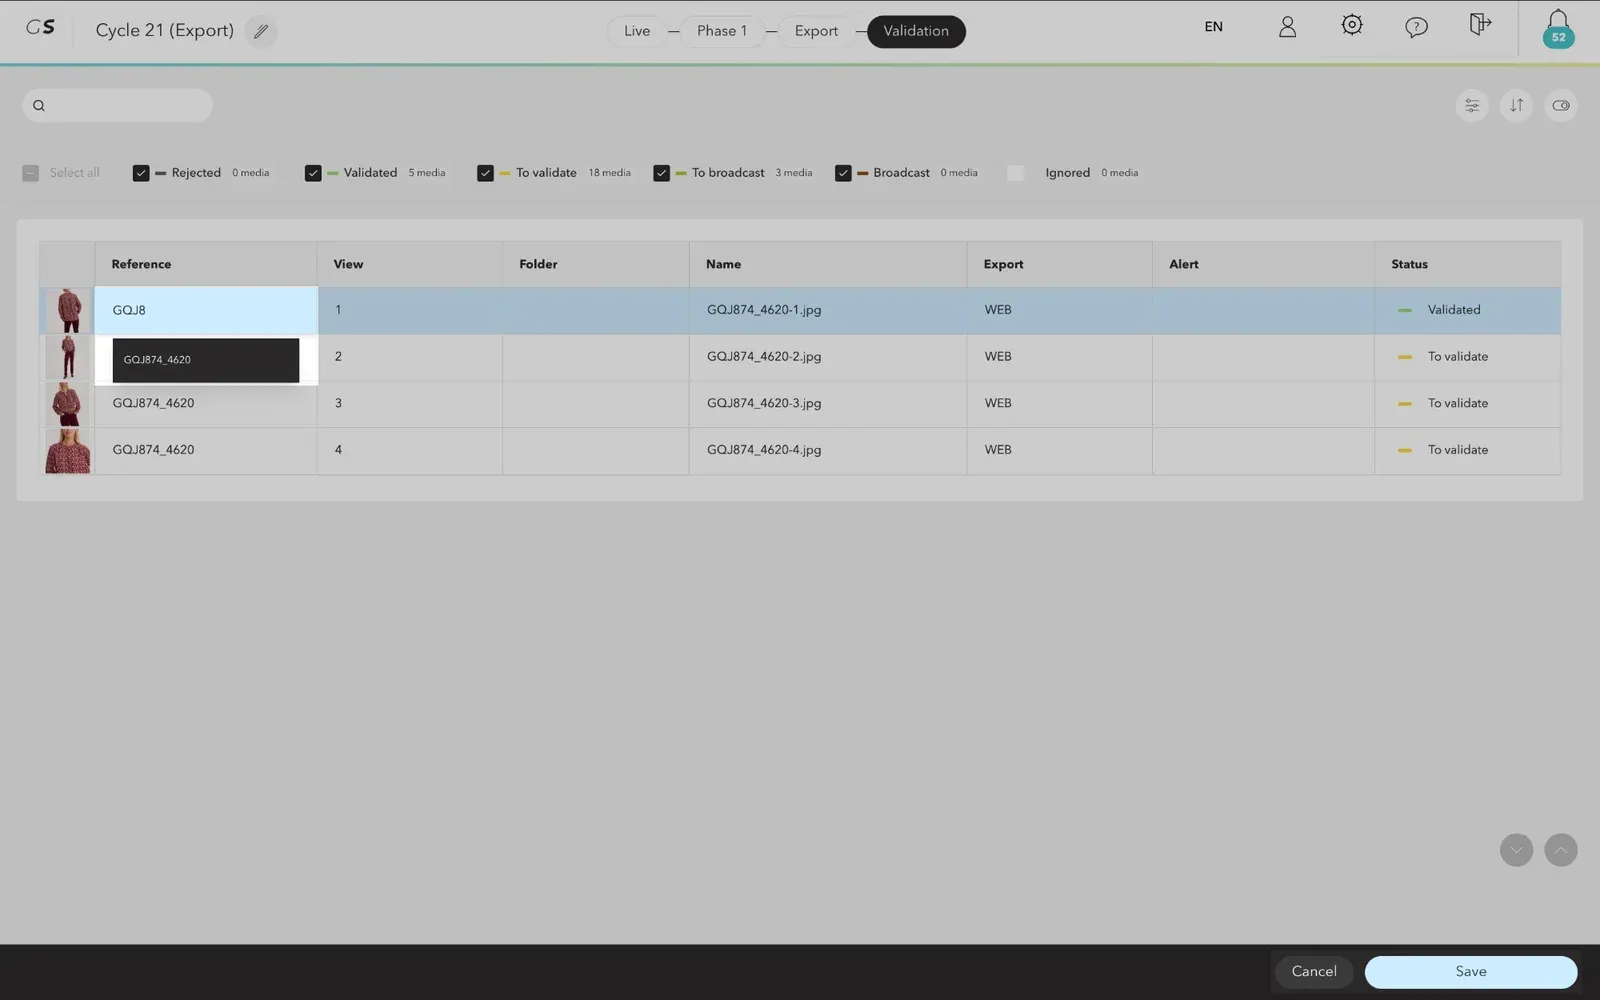
Renaming table: typing a reference with the catalog suggestion, and the Cancel and Save buttons

If renamed files had already been broadcast, Grand Shooting offers to rebroadcast them. Check Apply to the next renamed photos so you no longer have to confirm it.

When the media are grouped by reference, you can also change the order of a reference's views by drag and drop: the files are renamed accordingly.

Filtering, sorting and displaying

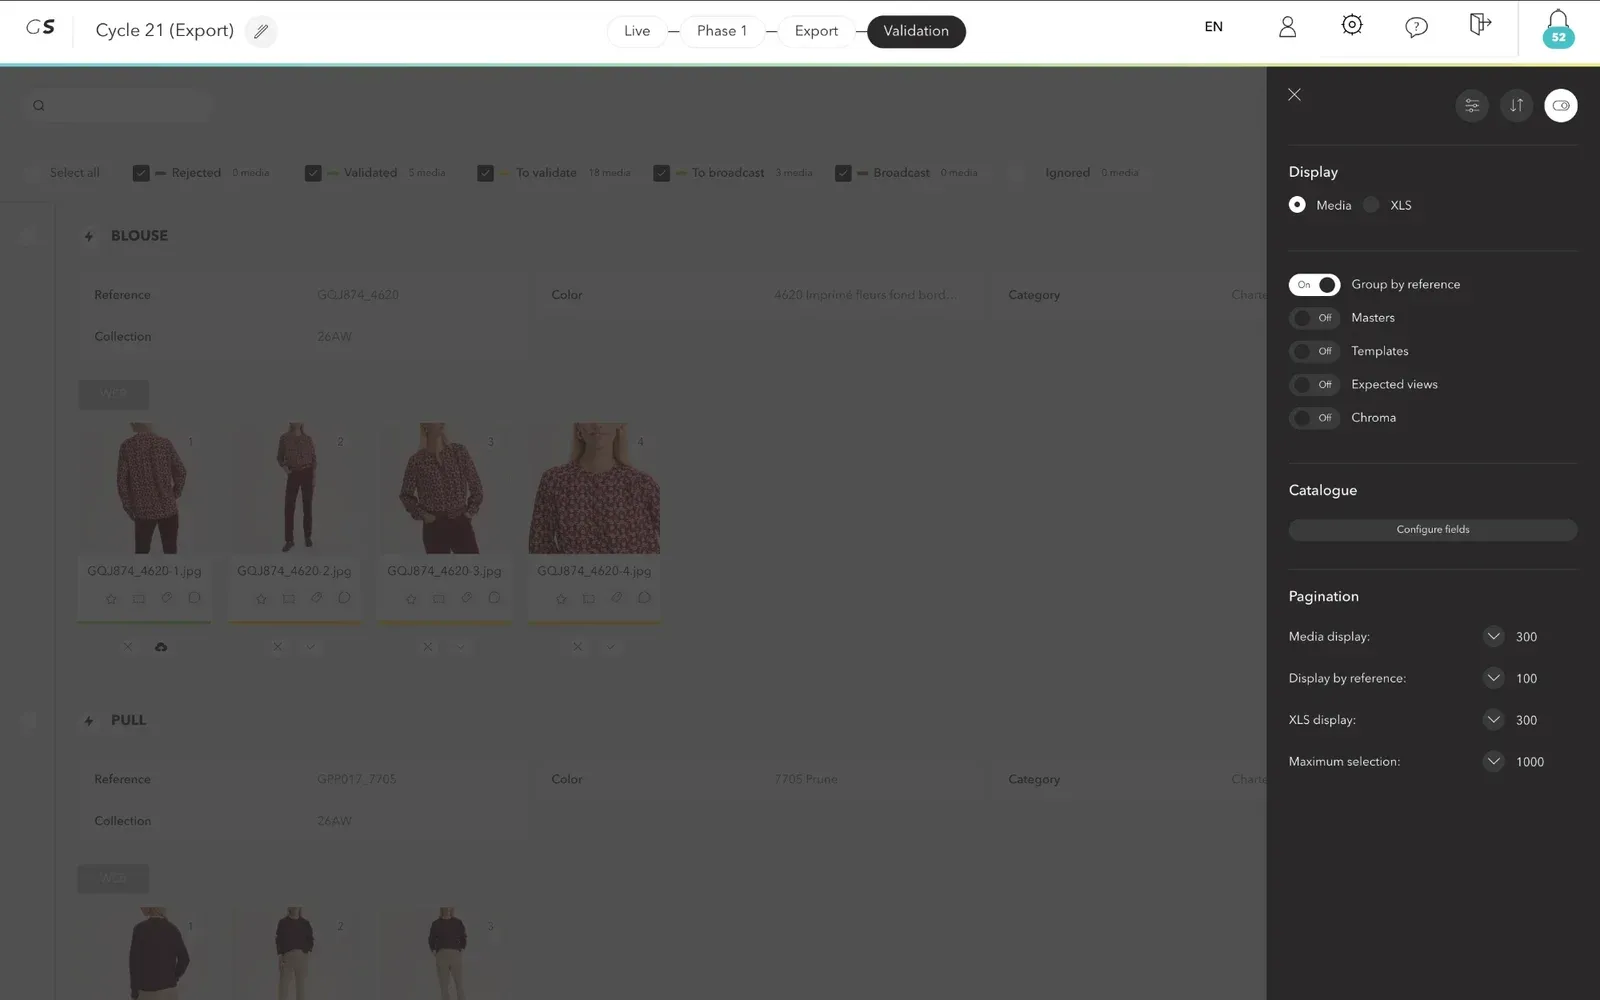
The Display panel

The Display button, the last one at the top right, opens the panel that sets how the media are presented:
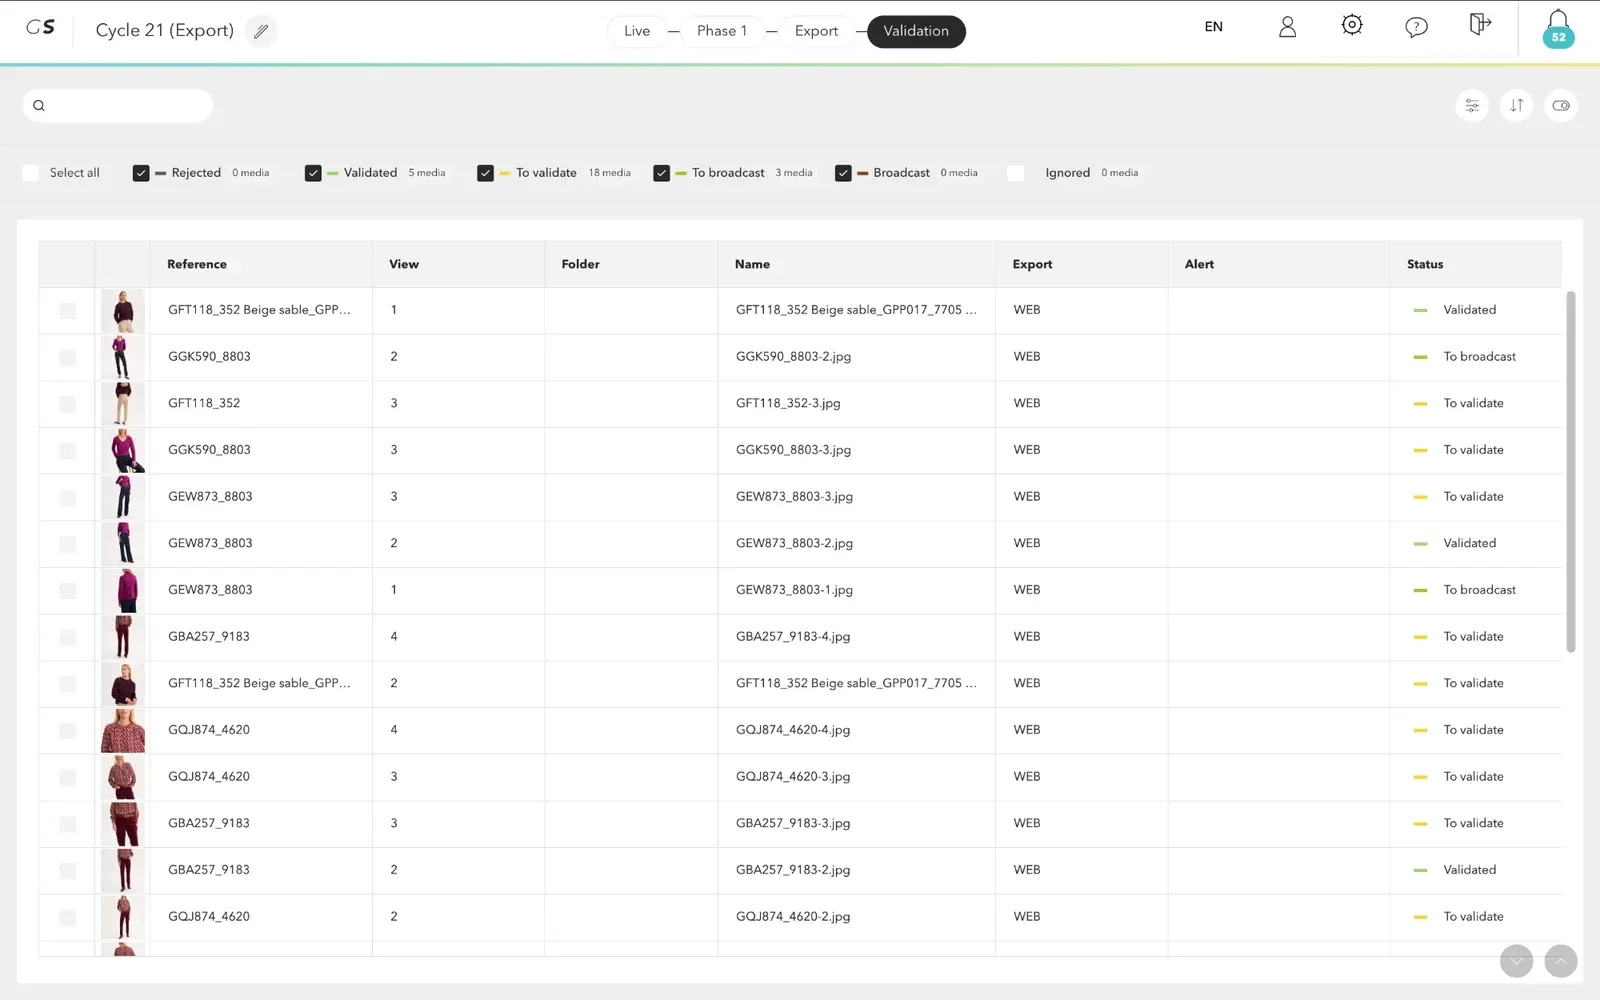
  • Media or XLS: show the media as thumbnails (Media) or as a table (XLS), with the reference, view, folder, name, export, warning and status of each file.
  • Group by reference: group the media by reference, with the catalog information.
  • Masters: the master is the image uploaded to the specifications. It is overlaid on the validated media for better control. Show next master moves to the next master.
  • Templates: show the template applied to each media. It is taken from the formats of the specifications.
  • Expected views: when grouping by reference, show the views expected according to the specifications, to spot missing views.
  • Chroma: show all the media available for the same reference, to make sure the products' colors are consistent.
  • Catalogue: the Configure fields button chooses the catalog fields shown when the media are grouped by reference.
  • Pagination: choose the number of media shown per page, in Media, by reference and XLS display, as well as the maximum number of selectable files.
The Display panel open: Media or XLS, Group by reference, Masters, Templates, Expected views, Chroma, Catalogue and Pagination
Customizing the display
XLS display: a table with the reference, view, folder, name, export, warning and status of each file
XLS display
Media grouped by reference: the catalog information above the views of each reference
Display grouped by reference

The Filters panel

The Filters button, the first one at the top right, lets you show only part of the media:

  • Markers: choose Show alerts only to show only the media that have a warning, or All to see all the media again.
  • Stars: filter the media by their rating.
  • Colors: filter the media by their color label.

The Reset button restores the default display.

Sorting

The Sort by menu orders the media by Date (newest or oldest) or by Reference (A-Z or Z-A).

Warnings

A warning flags a media to check before validating it, for example:

  • a non-compliant file name, or one that does not follow the naming rule;
  • a reference missing from the catalog, or missing from the production's list of products to shoot;
  • an unexpected or missing view;
  • a file that does not match the format of the specifications;
  • an image without a color profile.

Keyboard shortcuts

Shortcuts do not work while typing in a field, or when a window is open.

ShortcutAction
Shift + VSwitch from the old validation to the new one
Ctrl + A (or Cmd + A)Select all
XSwitch between Media and XLS display
GGroup by reference
EShow expected views (when grouping by reference)
CShow chroma (when grouping by reference)
MShow masters
← / →Previous / next master (masters shown)
TShow templates
D or Ctrl + B (or Cmd + B)Change the image background color (white, light gray, medium gray, dark gray)